
Let's jump right in, shall we?
The Materials:
- Flat Head Screw Driver
- Staple Gun of Some Type (I used an electric one)
- T-50 Staples (or whatever size you want to use)
- Ply Grip (about 2 yards or so)
- 2 Metal Tack Strips
- Hammer
- Rubber Mallet
- Sewing Machine (or hand sewing skills)
- Zipper Foot for Sewing Machine (or mad hand sewing skills)
- About 10 Yards of Fabric
- New Batting (that doesn't smell like old people)
If you haven't read my posts The Wing Chair (Intro) or The Wing Chair (Part I), I suggest you take a look. It will help you understand the project as a whole.
Okay, so as you remember, I started out with this:

And then I stripped it all the way down to this:

And now it's time to put it back together again.
Basically, you put the chair back together in the opposite order of how you took it apart. This is where the numbering that I did in Part I really came in handy.
So I started by adding the under the cushion piece. I used a scrap of fabric I had because my upholstery fabric was kind of pricey and I thought the polka dots made for a fun surprise. I stapled the fabric to the wood frame.
Next was the piece to the lower front of the chair. I think I should have sewed the part as an extension of my green polka dot fabric, but instead I opted for some stitch witchery. This front piece is a little bit tricky because you do have to sew a little bit. Now, I am no expert seamstress, so if I can do it, I guarantee you that you can too.
I laid the fabric across the front of the chair and pinned where the corners needed to be sewed. (I knew they would need to be sewed because the piece I removed had a seam there.) It looked a little something like this:

I turned the fabric inside out and placed it in the correct placement and then just pinned where I needed to make seams. I took those to the sewing machine and made seams. Then I turned my fabric right side out and ta-da! It ended up working wonderfully. Then I used the stitch witchery to bond the fabric to the green polka dot fabric and stapled (under the chair) the fabric in place. I had to cut a small slit where the legs were and then fold the fabric to cover the frame. Pull tight and secure.

When I was done, it looked a little something like this:

That was when the first "oh my gosh! it's going to look so good" set in...
Next (following my numbered items) was the arms. For all my pieces, I laid out the old pieces on the new ones (pretty side up) and traced them, giving myself an extra 2-3 inches around each border. I used a purple crayola marker, but you probably have something more professional than that.

I made sure to remember which arm was for which side, etc. This part was really pretty easy because all you do is add some more batting, wrap the fabric, and then staple, staple, staple... When you get to the front of the arm pieces, just kind of gather the fabric evenly and staple (this will be covered up later, so don't worry TOO terribly much about this part).
One important thing I learned was to keep a hammer nearby. For whatever reason, my nail gun didn't always completely secure the staple, but a few whacks with the hammer and they were in there to stay.
Here is my chair with both inner arms done:

The next part is the inside of the wings. But before I was able to go on to that part, I needed to make some cording/ welting (the round trim that looks so cool). I had to look up how to make it, but I found this awesome tutorial and managed to get it done. I went to JoAnne's and buy the cording to sew the fabric around.
I also found out that I needed to buy a new foot for my sewing machine- called a zipper foot. I think it cost about $3. What's unique about the zipper foot is that it only has a little metal guide on one side of the needle so you can get really nice and close. I HATED that zipper foot for a few days. I broke 6 needles on it and had to go to the store and get more. (It probably had more to do with the fact that I didn't know what I was doing and was using it completely wrong). But we finally made amends and I was able to make some beautiful cording.
Here's the cording in the works:


Be sure to look at the tutorial I linked to because it will teach you a trick on how to make your fabric last for really long cording and it's actually quite amazing. I had to read it over and over because I kept messing up (but I think that's just my issue). Be sure to take a tape measure around every area that will need cording so you know how much to buy.
Once I finished the cording, I sewed it to the bottom of my inner wing pieces. Then I added some batting, laid it so the cording covered up the ragged edge of the arms I just did and I stapled it to the wood frame. (This is common sense, but make sure you always staple so that no staples will be visible after the finished product.) Use the deconstruction process as your guide on where to staple what.
Once my inner wings were added, it looked a little something like this: (are you getting excited yet?)

The next part was the seat back of the chair. This used to be tufted but I did not want to mess with re-tufting it (even though I think it would be adorable), so I filled the holes will batting and then took another whole piece of batting and stapled it in front of the existing foam. There are little slits between the wings and the back of the chair that you can pull the batting and fabric through to staple and I stapled the top to the back of the chair.


I took some more cording and stapled it alongside the outer wing, across the back, and back down the other side, coming in just under the new arm piece. (Sorry I didn't take a picture, but try to remember back to how your chair looked previously... you'll get what I'm referring to.)
Then came the time for scary metal teeth. Grr. (I think I have already used the words "then" and "next" WAY too much. Sorry for the lack of creative words tonight.) This product, known as Ply Grip or Curve-Ease is AMAZING. I mean, it's a little bit of a pain to learn how to work with, but it's results are completely beautiful. And once you get familiar with it, you love it more and more. Here's a really great video on how to use Ply Grip. (It's how I learned).
I stapled my Ply Grip down the outer curve of my wing as close to the cording as possible so it would fit perfectly together.


And then I added some batting... just like the guy in the video taught me to do.

I trimmed the batting and added the fabric. I used a screw driver and my fingers to push my fabric into the little teeth. It beat my finger tips up a little, but what's a project without battle wounds? I did that part first and then I took the other sides and stapled them to the wood frame.

Thank you, Ply Grip, for making me look better than I am. Wow. Oh, and I ordered my Ply Grip online. I am told you can get it at upholstery stores, but I live in the Dallas area and had a hard time finding one, so it was much easier (in my opinion) to buy it online. I got it from DIY Upholstery. (Along with some more items I will be showing you later)
Then it was time for the sides. These were a little bit tricky because you have to use a cardboard tacking strip. I got mine at JoAnne's. The purpose of the tacking strip is to make a perfectly straight line with the fabric. It looks amazing when done, but it was a little challenging to work with. (I'd suggest recruiting a partner.)
I lightly stapled the top of my fabric where I wanted it, then flipped the piece up so that it's wrong side was facing me and placed the cardboard strip against the bottom of the arm roll and then stapled the heck out of it. Then I added my batting and flipped the fabric back down and stapled it to the wood frame of my chair. I did this for both sides. (See how clean my lines look?) I went ahead and made the pattern match up to the outside wing piece.

We are getting SO CLOSE! The last thing that I am going to show you today is how to do the back of the wing chair.
This is the point in which I had to stop and wait FOREVER because I had to order new fabric. In the rare chance that you want to read about that, you may do so here.
Ok, so once I got my new fabric, I laid out the old piece (like you've been doing all along, right?) and cut a piece for the back. Because this is the finishing piece for the visible part of the chair, it requires some extra (cool) tools. I used more Ply Grip and then 2 metal tack strips. This completed my purchase from DIY Upholstery.
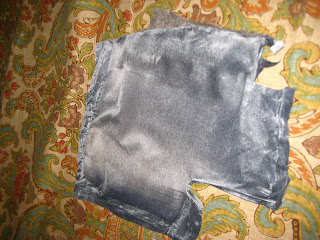
I added a piece of scrap fabric on the back just to give the sitter a little bit more back support and hopefully alleviate a little bit of stress from the fabric I was about to upholster. I have NO IDEA if this was necessary or even beneficial, but it sure seemed like a good idea, so I just went with it.

I didn't take any pictures of the metal tack strips, but here is what they look like.
I laid the fabric out and laid them under the (centered) fabric to see where I wanted them. It was a little bit of trial and error, but I poked the tack strip through the fabric and then turned it upside down so that the prongs would be going into the wood on the sides of the back of the chair. Again, refer to the deconstruction to know where they were. I wanted it perfectly centered and nice and tight. And I finally got it right.
Then I took the Ply Grip and stapled it to the back of the chair along the top line, as close as possible to the cording (remember adding that WAY back when?). I used my fingers and screwdriver method to secure these. I then pounded them closed with my rubber mallet just to be sure that everything was going to be secure.

Stapling Ply Grip consisted of many tries to get the staples just right. You want one edge of the staple in the little metal hole and the the other one fastened into the wood on your chair. My bulky staple gun didn't exactly help the matter, but I got by just fine.

Then I stapled the bottom of the back to the bottom of the chair and TA DA! I was done with the frame.
Here's the (close to) finished product:

And here's the front of the chair:

As you can see, I am SO CLOSE to being done. I still need to reupholster the seat cushion and finish out the arms. Grandma is going to help me out on those two pieces (I will provide a tutorial, I promise). So hang tight and hopefully very very soon I will have a completely finished wing chair to show you!
Thanks so much for your comments. They make me happy.
*UPDATE: CLICK HERE to see the completely finished project!
I'm linking up with :


25 comments:
It DOES look great. Can't wait to see the final product!!
I have a wing chair I need to reupholster but I just cannot get up the nerve. I keep thinking maybe I will just slipcover so I don't have to mess with the tack strips.
That is awesome! I have been toying with the idea of making a slip cover for our wingback but I think your post has inspired me to tackle the upholstery...
Thanks for all the instructions and advice!
Oh, my goodness! Your chair is gorgeous! I can't believe you did this, I know you did, it's just amazing! I know I could never do this! You're great and I love the fabric you've used!
Be a sweetie,
Shelia ;)
Wow this is great! I have a couch I want to do but never did it before and I am scared of it. Hoping to get up the nerve to do it. Thanks for the inspiration.
dreaming-n-color.blogspot.com
Looking good!...you are a braver girl than I! And you must have a super sweet Grandma that will come to help you out ;)
LD I am in complete and utter awe. You are a rockstar. That chair is going to be AMMMMAZING when you're finished. I cannot wait!
WOW..... OH MY GOOOOODNESS! Three cheers for you. That is simply amazing. What a brave little trooper you are to venture into the realm of upholstery!
Warm blessings,
Spencer
Love the fabric you chose...think I'll stick to the slip covers for now. But who knows what the future may hold!
I'm so impressed! Way to go!
Kate @ welcomedtempest.blogspot.com
I applaud your determination, skill, and patience. I've done it myself, it's not easy to strip all that old stuff and pull the tacks.
Great Job!
Kristy @ 4 the love of WOOD
WOW. I am so excited that i found you! YOU really did a great job and i have an addiction for beautiful chairs. I have been draggin my feet to get mine done but you are an Inspiration!
thank you! come visit me
chickhardware.blogspot.com
Wowza you did and awesome job and I love your fabric selection. I have a fear of patterns myself ;) I love the polkadots under the cushion that is a fun surprise!
you guys are awesome. thanks so much for all the encouraging comments. i can't wait to show you the {completely} finished product.
I love what you did to this chair! Well done and beautiful choice of fabrics :0) Blessings, Katy
Wow, I can't wait to see the finished chair. I am in the process of reupholstering a rocker and it isn't nearly as hard as this looks. It really looks terrific.
I am book marking this! Thank you so much for showing how the pros do it! Love your fabric too!~
Oh, your chair is dreamy! I love that fabric. I've always wanted a wing back chair, but right now we don't have room for one.
I am SO, SO, SO impressed! It looks totally professional and I would be scared spitless to try it, but you've made it look do-able! Well done and congrats!
This looks amazing!!! Great choice of fabric and it looks totally professional. I am about to reupholster some chairs but didn't think I would have the guts to do a wing chair (a huge order from DIY upholstery just arrived in the mail). If my other projects go well, I'll follow your tutorial and try a wing chair! Thanks for sharing.
Wow! I am speachless! Seriously, was this your first reupholstery project?
This is the first tutorial I've see that actually makes me think I could do it myself and achieve a good result. I have two wing chairs from craigslist in my basement that I just can't seem to find the nerve to take apart.
This WAS my first reupholstery project, and you can totally do it too! I promise!
It makes me so happy that this has inspired you to try it! If you have any questions (or just need encouragement) along the way, feel free to shoot me an email and I'll be glad to help!
mrs.diffendaffer@gmail.com
Looking fabulous! Bookmarking for future reference.
This is fantastic! I have a similar chair that needs a new lease on life. I may just tackle it after seeing your guide. By the way, where did you purchase your fabric if I may ask?
Thanks!
~Laura
Thanks, Laura! The fabric is from House Fabric. It's the same exact print at Pottery Barn's Simone print, but cheaper when listed as its other name, Lutron Vintage. Here's a link: http://www.housefabric.com/Product.aspx?ProductId=3253
This has been SO helpful! I have a friend asking me to do it for her and I was wondering how much it cost you?
Post a Comment